Friday, November 2, 2012

From The Ground Up! Stage I: Feet

I'm starting with the feet!
Seriously. I've put everything aside and am working on the boots.

Not my boot... just a space-filler pic
until i can take a better pic of mine.
Anyone got like a week's worth of spare-time
they can lend me so I can get something
appreciable done on this?  LOL
I have decided to see if I can take the malleable properties of the aluminum and minimize the number of seams that I have by using pop rivets in specific places and bending the aluminum to fit each piece
If it works, I will have a metallic look to the armor with minimal sharp-edge seam exposure...
(and yes L-EF, I will be grinding the edges to smooth the metal out LOL)

It works in theory, anyway...

As an aside, does anyone have any idea how to get VirtualBox (running Windows 7) to recognize a printer with a 'base' of iOS 10.7?
I have the printer driver all installed, the printer works fine when printing from iOS (naturally) and it apparently sends the signal OUT when sending it from VirtualBox/Windows7... the printer is being recognized and everything...  but apparently there's something not connecting the signal to the printer... might it be a networking issue?
Do I need to open permissions for the printer on the iOS side of things?
/grumblestupidWindowsplatform

Friday, October 26, 2012

The Best Laid Plans...

I know... I take forever to post new content.
I have an excuse.
I'm currently working seven days a week in a push to drop the hammer on some student debt.
Worry not, though... I'm reducing it to six days... when work starts interfering with my capacity to hit the gym, I start getting cranky.
Gotta keep perspective!
(Yes, yes... I know I was injured... shush! LOL )

In terms of the armor, my work schedule has interfered with THAT, too... but fear not, True Believers! I may have stumbled upon something that could simultaneously solve my surfacing issues *and* my joint material issues...
... I just need to talk to some plastics experts in regards to adhesives and painting options...

The BAD news... is that the armor isn't going to be ready for Hallowe'en... it's a bit of a low-expectation year this year anyway...

So I'm re-evaluating.
The armor WILL be completed... but I've decided to de-emphasize the 'huge con-stress' style of smashing everything together and hoping the glue holds it long enough (I have NO idea how people can be happy with Plasti-Dip... =/ ) and focus more on assembling the pieces to last longer than the time it takes to put it on and then tear back out of it.

(Worry not Toronto Ironman... I'm leaning back towards metal again... but in a slightly different direction. =D )

I've been drawing up plans... and I'm starting with the feet.

Side-benefit... this will allow me to take more pictures.  =)

Friday, October 5, 2012

Metallic... uh...

Yeah... in adding to the laundry list of 'Things I should Have Thought About Before I did Them..." 
... I now have six sheets of 2' x 4' 1/16" thick aluminum.

"WHY?" you ask?

As I said... it's Toronto Iron Man's fault. (Curse you, Robertoooooo!!!!)


(j/k... Roberto's a kick-ass guy. Props to him for the idea!)

This is him: https://www.facebook.com/TorontoIronMan?fref=ts

See... he cut the Mk VI out of foam (via the pattern - the same one I was using before I started the Mk VII) and then turned around and cut the same pieces AGAIN out of sheet metal... and hot glued them to the foam.


It WAS working... kinda... then I ran into a few snags... namely the little pieces, the unwieldy-ness of the cutting of the aluminum and the pointy edges.
I'd rather not snag someone else just brushing past them. =(

So - for now - I will be resuming my foam + white glue + polyurethane process... and I'll likely re-examine the metal process after Hallowe'en.

To that end, though... I've taken to pouring miniscule (like capful-sized) amounts of 'Part A' and 'Part B' of the polyurethane and mixing them, pouring them in small dollops onto the armor pieces... then smearing them around with my fingers (in rubber kitchen gloves).
Seems to be working... the urethane spreads thinly enough so as to not drip all over the place, gets spread evenly and is spread soon enough within the urethane's pot-life of three minutes that I can get it all ON before it starts congealing.

Sometimes over-thinking is actually not the best thing to do.  =)

Stay tuned!

Thursday, September 27, 2012

Somebody stop me! O.O

Quickie update...

95% done the back... just need to fill in one of the shoulder support-thingees... and then 'tape' it into a shape that will sit properly on my body.
Then apply the flaps (see previous post).

Going to finish the boots tonight as well... leaving me free and clear to start on the gloves on the weekend...

That said... I went out today... and made a purchase of something that may take my armor in a different direction.

Hoo-boy...

"Toronto Iron Man" - this is all your fault!  =)

I will do a test-run tomorrow of a small piece - probably hand-plates and/or hip pods again... and if it works as I hope it will... then I'll do the chest.

Then spend the weekend going bananas.  LOL

Tuesday, September 25, 2012

Flap flap flap!

Quick and dirty update...

FLAPS!

Nothing fancy... I SHOULD be at the gym right now... but a minor pull in my lower back has me sitting on the couch, Netflix on the television... and a small cutting board on my lap.

All that's left to do currently is the rest of the back, bits of the boots and the gauntlets.

Oh... and the elbow and knee and hip joints...   =)

Stay tuned!

Friday, September 21, 2012

Adriaaaaaan!

Quick update... 

I not only finished the thighs (and spent a day or so hammering through the shins) but got the first (of three) layers of the 'sealant' white glue layers onto them.

Layer #2 happens this afternoon, layer #3 probably on Sunday.

I've finished cutting/pasting probably 50% worth on the boots... still haven't figured out where some of the pieces go... but that was a thing from even BEFORE I started with the foam.

So all that's really left to do is the back (and the thruster flaps) and the gloves.
Still haven't gotten to the urethane, truth be told... I shall bite the proverbial bullet and do a small sample today. Probably the hip pods and hand plates... as they are fast and easy to replace if I wreck them. =)

"Uh, yo well, uh, maybe I'll fight Apollo, uh, maybe I won't, you know?"


Also... my elbow/knee and hip joints?I have an idea... instead of using pop rivets and sheet metal, I'm going to try cutting the pieces out of thinner foam and 'plastic-ing' them like I am the rest of the armor... then assembling them (layered like before) with an elastic strap instead of pop rivets. Theoretically the pieces/layers should be connected to each other and move as units, one atop the other... so 'hot glue + strap' should be no less effective than 'drilled hole + pop rivet'. The trick, i think would be to cut them layer by layer... an easier task, I'm wagering, if I don't have to calculate extra length due to edge-folding and stabilization due to material and rivet strength.


I just wish I had figured this stuff out BEFORE making all the mistakes. /sigh
Ah well...

"I fight so you don't have to fight." ~ Rocky Balboa (Sylvester Stallone) "Rocky IV"

P.S. Don't ask why I'm quoting Rocky. I don't know. It's just THAT kind of day.


Sunday, September 16, 2012

Yeesh!

Apparently I need a reminder or something...

Seriously... how do people find crap to talk about every single day they do a blog?
I'm of the mindset that if I have nothing to report... you don't want to come to the blog just too see me say 'Erm... nothing to report'... THAT would be lame.

That said,  I (finally) have a little to report...
Sorta...

Got the white glue coats on the following pieces:
- chest
- upper forearm (2)
- lower forearm (2)
- upper arm (2)
- abs/torso
- cod
- hip pod (2)
- hand plate (2)
- upper shoulder (2)
- lower shoulder (2)

The thighs are 90% complete in terms of foam and hot glue... they will then undergo the white glue undercoat before I urethane THEM as I will be (likely) urethaning the above pieces tomorrow.
ALl but the abs, at any rate... for some reason, I decided to assemble them BEFORE I solidified them... so the glue application has been - to say the least - interesting...

Does this outfit make me look fat?
Still have the shins, boots and back to do with the thicker foam... I should be able to accomplish them (at very least the shins) by the end of next week.
I'm going to then tackle the gloves with some slightly-thinner craft foam I picked up at Michael's (it's a chain store for crafting people - mostly nick-knacks and hobby stuff, but occasionally I can find suff of use to me)

I met a guy on Facebook from Toronto who did the foam pattern from the MkVI suit and then hotglued sheet metal (he says 1/16") cut into identical slices right onto the foam.
I have to admit, I'm sorely tempted. He says it (the whole suit) weighs around 20 lbs.
I can live with that... it won't get done for Hallowe'en this year, but I'm thinking I'll do it for convention season 2013.

Wednesday, August 22, 2012

Foam is Where The Heart Is...

I'd also have used "Foam, Foam On The Range...", "Foam Is Where You Hang Your Hat..." and "There's No Place Like Foam..."

Yeah... things have been crazy these past two weeks.

First... that abdominal effort I went to?
Utter UTTER failure.  /sigh
Point of fact, but I nearly gave up the entire enchilada, but for AV suggesting in her not-so-subtle way that 'You've already put so much effort into this... finish it!'

So I was flipping through pages on the RPF (Replica Prop Forum) and a few Youtube videos popped up.
One was by a fellow from the UK named James Bruton... XRobots on YouTube... who lauded the greatness of foam.
"Foam?" I asked, "... but doesn't that limit the detail of the pieces?"

Apparently not all that much...

"What about paint... and the appearance of the pieces?" I insisted. "Won't the foam just look like a painted foam crafted thing you did in public school?"

Apparently not.

Apparently it's entirely possible to coat the foam in a poly-urethane layer that grants it a hardened plastic shell with minimal effort.
And... I might add... a FRACTION of the cost of the resin/bondo process.

As for progress... here's a few pics of what I have done in the past week and a half or so:
Yes. TEN DAYS.
Keep in mind that the standard 'working, family obligations and such' haven't changed.

The pile of stuff... some of it anyway... the hip pods and hand plates are getting the glue treatment...

Separate pile #1 - the torso - abs and side plating... 80% done... needs two more spine sections and then to be assembled... I'll be using a trick I found online to assemble them... similar to my very first idea before (elastic straps) but without all the rivets...

Separate Pile #2 - the complete (right?) arm and left forearm... and 3 out of 4 shoulder plates.
One more shoulder plate to go... and the left bicep.

Separate Pile #3 - the cod, chest and... NECK!
Later this evening, I redid the chest (as this one's too small on me)  and sealed up the neck so I can apply the glue process to it on the 'morrow...

Sunday, August 5, 2012

Kearstin!


From the "Credit Where Credit Is Due" Department...

I give you... Kearstin Nicholson!


Sassy, leggy and quite unafraid to tell you what she thinks.

Fair warning: she is definitely NSFW, not so much for any graphic content (there is some) but for the shock value.
As I said... Kearstin will tell you EXACTLY what her opinion is.

This gal is definitely on my 'To Meet' list if I ever start making a name for myself in the cosplay/costuming world.

http://ikearstin.tumblr.com/

Sunday, July 15, 2012

Back To My Roots...


Bend test: successful!
Ignore the spikes, those are just space-holding
pop-rivets to keep the pieces together  temporarily.


Many of you won't know this - and I've sworn the rest of you to secrecy on the details - but I used to do costume work a number of years ago.

Oneof the gigs I did was dress as a Klingon from Star Trek... and the leather battle armor I made was an effort of some epicness...

But that's not important, only the metallic trim I fashioned for the edges of the armor.

Granted it wasn't the most elegant of crafting jobs - I was much younger and quite inexperienced in Costume-Fu... but it got the job done.
My Costume-Fu is greater now.

The elbow and knee 'units' for the armor needed re-doing.
Yes, again.
Shush.
The reason being, they were starting to protest the strain of my a) bending them excessively due to my b) fairly significant mass gain over the past few months.
Seriously.
When I initially fashioned the elbows, for example, I made them a 'tube'... so it was the same diameter hole at one end as it was on the other... which made things really loose for my forearms and - unsurprisingly - tight on the bicep end of things.
And... as it turned out, impossible to fit into my new forearm pieces...


So... I had to do something else... and I was all out of plastic pots. LOL

At the local home-building-type hardware store, you can get aluminum flashing (for roofing) in rolls that are fairly inexpensive ($35 for a roll of 50 feet at 6 inches wide)... and the aluminum is small enough in gauge (thin enough) that cutting it with tin snips is effortless.
Try cutting stove-pipe metal and you'll understand why 'less effort' is crucial.

So what I did was measure the circumference of my arm at various levels... added an inch for comfort and two more inches for an 'overlap bend' for each piece so that they have added strength at the joints... and semi-voila!
New arm unit!

So far, here's the front half of one arm:


The cool part is that I'll be able to simply plunk each piece onto the aluminum strip and trace them... so the second arm-front will take less than half the time... the same cutting and drilling of holes, without the nit-picking and section-measuring.


So far, though, I think it looks pretty spiff!  =)

More progress shots as the weekend goes by (as in 'tomorrow')

Tuesday, July 3, 2012

Doesn't Have A Leg To Stand On...

... Yet.

Here's the right thigh, though...
Having a closer look at the side panel (it's face-down right now, but it's a hollow on the outside of the leg) gives me a bit of an idea... I've been trying to figure out where to put the 'master control' (as it were) for the helmet and chest plate controls... and it MIGHT work if I put them on the side of the thigh.
At THIS point, though, I'm just thinking out loud... so somebody stop me! ;)


A bit of a hint and trick situation, though... take a look inside the thigh... and here's a closer-pic to show what I mean.
Tape. Masking tape, to be precise (although I'm sure any tape will work...)
The thigh isn't a small piece... and being a big tube, is prone to collapsing even with as little weight as the liquid resin.
Trust me... it will collapse if you're not careful.
Add to that the complication of all the little nit-picky detail lines... which are held on with a small amount of rubber cement... and you have a piece that LOOKS pretty... but is REALLY fragile.
When you go to resin your piece - especially the larger ones - tape the seams ion the inside.
Trust me. You'll thank me later.
THIS piece is the result of a collapse-and-repair effort... where I was basically up to my elbows in resin trying to get the little bits stuck back together. Thankfully I hadn't applied the resin (outside layer #1) that long before... so it hadn't 'moisturized' the inside of the paper (yay for 110lb cardstock!).
But yeah... trust me on this one... tape the fragile lines from the inside... they will hold together WAY better than just trusting in the support pieces alone.


A few more updates, too... got the neck finished on the weekend... and the outside resined... will do the inside tonight, along with the final 'repair' adjustments to the right thigh... and will complete the outside layers of resin on both shins.


The neck wasn't really a concern in terms of sizing... most people have similarly-sized necks... but if you are a little worried, measure from your sternum to your adam's apple (or so) as a rough estimate to see how many millimetres you 'measure up' as compared to the 3D representation in the file.
If it's close, you're fine.  =)


Also... it can't hurt to apply the resin in sections, either, to start with... as I did with the shins.
Notice, as well, that pieces like the shins have the front-and-back ankle sections as separate pieces... do these ones separately... you can always tape them down when you go to Bondo them or - if they are actually meant to be free-moving - connect them with whatever fastening devices you will require for the job.


Oh hey... here's a bit of a 'before-after' shot of the (under) shoulder bells... with a single layer of Bondo.
I will be putting at least two layers per piece and being a bit more careful and smoother with the second layer (probably on the weekend coming) so I can control the lines and keep them 'sharp' or 'smooth' as appropriate.

Wednesday, June 27, 2012

How far ahead of the curve do I want to be...?

.
.. should I...?I mean... it's only really a paint job, right?
I could switch it back to the old red-and-gold anytime, right?

Somebody stop me... O.O

Saturday, June 23, 2012

ABsolutely ABominable ABsenteeism!

Well now... I've been a bit busy. 
Too busy to regularly update?
I got no excuse.
That said, there's progress!
More snags... sorta... and a lot more detail into the pieces.
Case in point - the torso.
Some patterns have separated the abdominals and the lumbar from the sides... but this particular pattern has them all connected.
I have to say it works... to a point.
The point IS... if I screw up putting it all together, I'm gonna be hella PISSED OFF!
... it took night on almost two full days to do these pieces... 42-ish pages of print to cut and paste... so just about a complete day of cutting ALONE.
I do NOT want to have to redo any of it.  =(
I'l be buzzing in and out of my workshop like an anxious parent until the resin dries and I can feel reassured that the pieces won't fall apart.

The detail? Fantastic! Seriously... this is going to look SICK when it's done.
The problem is... (as always) finishing it.

The good thing is that the cutting and pasting is the longest and most arduous part... having tried a few Bondo-plus-sanding attempts already, that is the fastest part of the process... it helps that Bondo actually dries within a few hours of you applying it... so i could conceivably do two layers in one day!
The GREAT part about this Mk VII pattern is that the detail is done FOR me already! Just keep the gobs of Bondo out of the tiny crevasses and smooth it all out like putty when it's drying... and I should be good to go!

That said... here's a tally of where I'm at, in terms of resin progress:
The chest, back, upper forearm (R & L), lower forearm (R & L), palm (R & L), bicep (R), upper shoulder (R & L), lower shoulder (R & L)
... are all finished (and ready for Bondo!)
I HOPE to get to them by tomorrow at the earliest, if not find some time in the early part of the week to slather some Bondo around... this time in small layers.
/grumble
/irritated
/makingashowofprotestingbutsecretlylovesit
The cod piece and torso levels will (hopefully) be dry enough tomorrow to add a quickie internal layer of resin so I can ensure their stability... and while it's drying I might try to be sneaky and cut slices of fiberglass cloth out and stick them to the drying internal surfaces... it should be light enough to not interfere weight-wise, and sticky enough to hold them in place so that I can slather the resin into them for the strength with the subsequent layer.


Thursday, June 7, 2012

A Quick Update To Get Something Off My Chest

Nothing fancy... just a quick update so I'm not deluging a single post with a boat-load of pics.
Gotta keep you lot coming back, yeh?  LOL
First, some before and after.
The first pic was the original forearm (as printed) straight out of the pattern in the Pepakura pdo file.
Notice how the top area near the crook of my elbow seems like it might split apart at any moment?
It did.
I flexed my arm. /sigh
So obviously it wasn't going to work at that size... expecially considering these parts are the 'Upper Forearm' pieces and see the rounded area near the bend at the elbow?
That's where the rounded pod of the Upper Arm (Bicep) piece will articulate.
The hinge is AT the elbow... so the smaller piece simply would need to be bigger.
So I scaled the forearm pieces up - keeping the same scale for both upper and lower forearm pieces and the bicep pieces.
The larger unit (pic #2) seemed okay... but I honestly felt (perception-wise) that it was too big.
Appearances can - as they say - be deceiving.
My hand ft through fine and when I slid it up my arm, it went to where it was supposed to and fit well enough that I should be able to slide it up over my elbow joint unit.

And my progress so far:
Two upper forearms, two lower forearms, two elbows, two hand plates, a bicep and two palms (back and front).
All have two outer coats of resin and will receive an inner resin coat in a day or so.


Oh... and the chest:

=)

Friday, June 1, 2012

Two Weeks Too Long!

Hey gang!

Yeah yeah it's been a while.
Lower forearms
I have results, though.
Left arm is complete (minus the fingers) and the Right arm is almost done to the same point.
I'll be applying the first outer layer of resin tomorrow, and probably the first inner layer the following day.

I hit a bit of a snag again, though...despite the fact that I have the brand-spankin' new Pepakura Mk VII pattern, apparently a lot of the armor was drawn from proportion and movie stills; I failed to take into consideration that I am not 5'8" and 175lbs (as Robert Downey Jr. is).
Far from it.
6'2" and 205lb makes me a linebacker by comparison... I can only imagine how I'm going to look when I'm in the suit. LOL
Hand plates
So a chunk of the time between now and the last post was me printing the forearms, realizing how they didn't quite fit and redoing them.
Also the fingers... which were nit-picky as hell... and still have to be redone... I have shorter, blunter fingers and need to resize the gauntlets accordingly.
Luckily, the palms fit fine, so it's only the fingers I need to redo, and then only the middle joints - the fingertips are fine as well.
I have to use a bit of a spot-fix on the technique I'm using to resize them, though... I'll detail that in an upcoming post.

As for proportioning the armor properly, I found a way to do so that seems to work... and props to 'Xtreme Tactics 101' on the 401st forum for pointing this out.
Elbows
- Get as many reference photos as you can of the movie-version of the armor...  and print a good one that shows the bodypart you want to size.
- Measure (or have a friend measure) your height and the height of the 'movie' picture you printed (all in centimetres)... and compare the two... find the ratio (and round up)... 'Xtreme Tactics 101' says to round off, but it's better to estimate a little bigger than have it fit too snugly, in my opinion.
Chest (inside)
Try to get a picture that's as large as possible, it makes the ratio conversion a little easier.- Measure the height of the picture )and add a few (5-10) centimetres here and there for the bottom of the boots and the height in the helmet, and all the rest of the 'extras' that will make the armor a little bigger than you are... and measure your own height (if you measure in inches, multiply by 2.54 to get your height in centimetres).
Biceps 
- divide the height of the picture into the height you found for yourself, and there's your ratio number.

Okay... so the movie picture, with the applied ratio gives you a solid centimetre measurement for the estimated size you will need the armor piece to be to fit your body personally... if it helps, picture YOU in the armor that you see on the page in front of you. How long/broad would it have to be to fit YOU underneath it?
- Measure each bodypart (getyermindoutofthegutter!) that you want to print and apply the ratio between the 'movie' measurement and the 'you' measurement.
... now multiply that centimetre measurement by 10... now it's in millimetres (which is what Pepakura uses)
Upper Forearms
In Pepakura Designer, there is a way to apply a scale change to the 2D model... take your estimated number (in millimetres) and plug it into the appropriate X-Y-Z axis selection (for example, head height, forearm length, etc.)
That should be enough to size the piece appropriately.

More on this later.

But yeah... like I said... I've not been idle:

Friday, May 11, 2012

I'm Now "Ditching the Shiny Rims"

This represents probably 10 hours of my time, I'd estimate... between cutting all the little pieces and gluing them together... three pieces of the hand on the right, two on the left and two (right) thumb pieces... yeah... 10 hours or so is about accurate.

But LOOK at the DETAIL!
(Admittedly, these hands are much more detailed than some of the larger (for example the arms or chest) pieces... I'll be at this for a bit of a while longer, but the 'fine painstaking detail' part sort of ends with the larger pieces, purely on the grounds that the individually cut pieces are SO much larger.)

See... I've come to a bit of an impasse... the resin jobs I was doing had to be re-done... and the Bondo wasn't applied with any skill to begin with... I was spending just as much time fixing my errors than I was moving forward.

So I made an executive decision.
What helped was A's brother (J) coming to stay for a while to take some summer courses at the university... he lent me the use of his PC laptop... and I downloaded Pepakura....
...
...
... and the Mk VII pattern.
O.O

Recently (semi-recently) a guy calling himself DarkSide501st uploaded the pattern for the Mk VII suit and let the Replica Prop Forums know!

Those hands? They were created by another guy calling himself Zabana.

Yeah... I'll be doing things a bit differently this time around... and spending a lot more time 'pre-planning' and making sure I have figured everything out detail-wise BEFORE I plunge into the next step. My workshop is full of half-assed Pepped, resined and Bondo'd attempts... and I may even go so far as to complete each piece (or set) before I move on to the next one.
That part I dunno about, but I'll be sure to keep you posted. =)

Thank you to Robo3687... his were the Mk VI (triangle) chest files that had been saved as pdfs and made my initial foray into the armoring cosplay possible.
Worry not, I may yet go back and build the Mk VI... I haven't completely back-burnered the idea... but there is a plan in the works to get me to Seattle in late August for PAX (Prime).

I WILL have the armor done by then.

... starting with the hands. =)

Monday, April 30, 2012

Elbow and Knees, Redux


Yeah... there were a few problems with the first (let's call it's Mk I hee hee) version of the knee and elbow joints.
'Before'
'After'
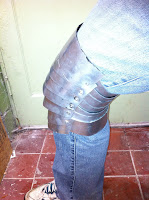
The inside (concave) bend was fine... they both articulate beautifully... but the outside (convex) curve left gaps between the articulated pieces.
Derp. Turns out... the wood bugs are better at this than I am. The pieces were too slim and gapped too much when I bent the joint.
Back to the drawing board!
I pulled the units apart... and set to work.

(As a side note, try not to pull riveted things apart if you have an option... it's time consuming and you have shards of little metal pointy-bits all over the place. You'll find them all eventually - especially if you walk around in bare feet - but in the meantime, it's a bit of a chore to do... I guess that's why you have my handy-dandy guide so you don't end up making those mistakes, yeh?)
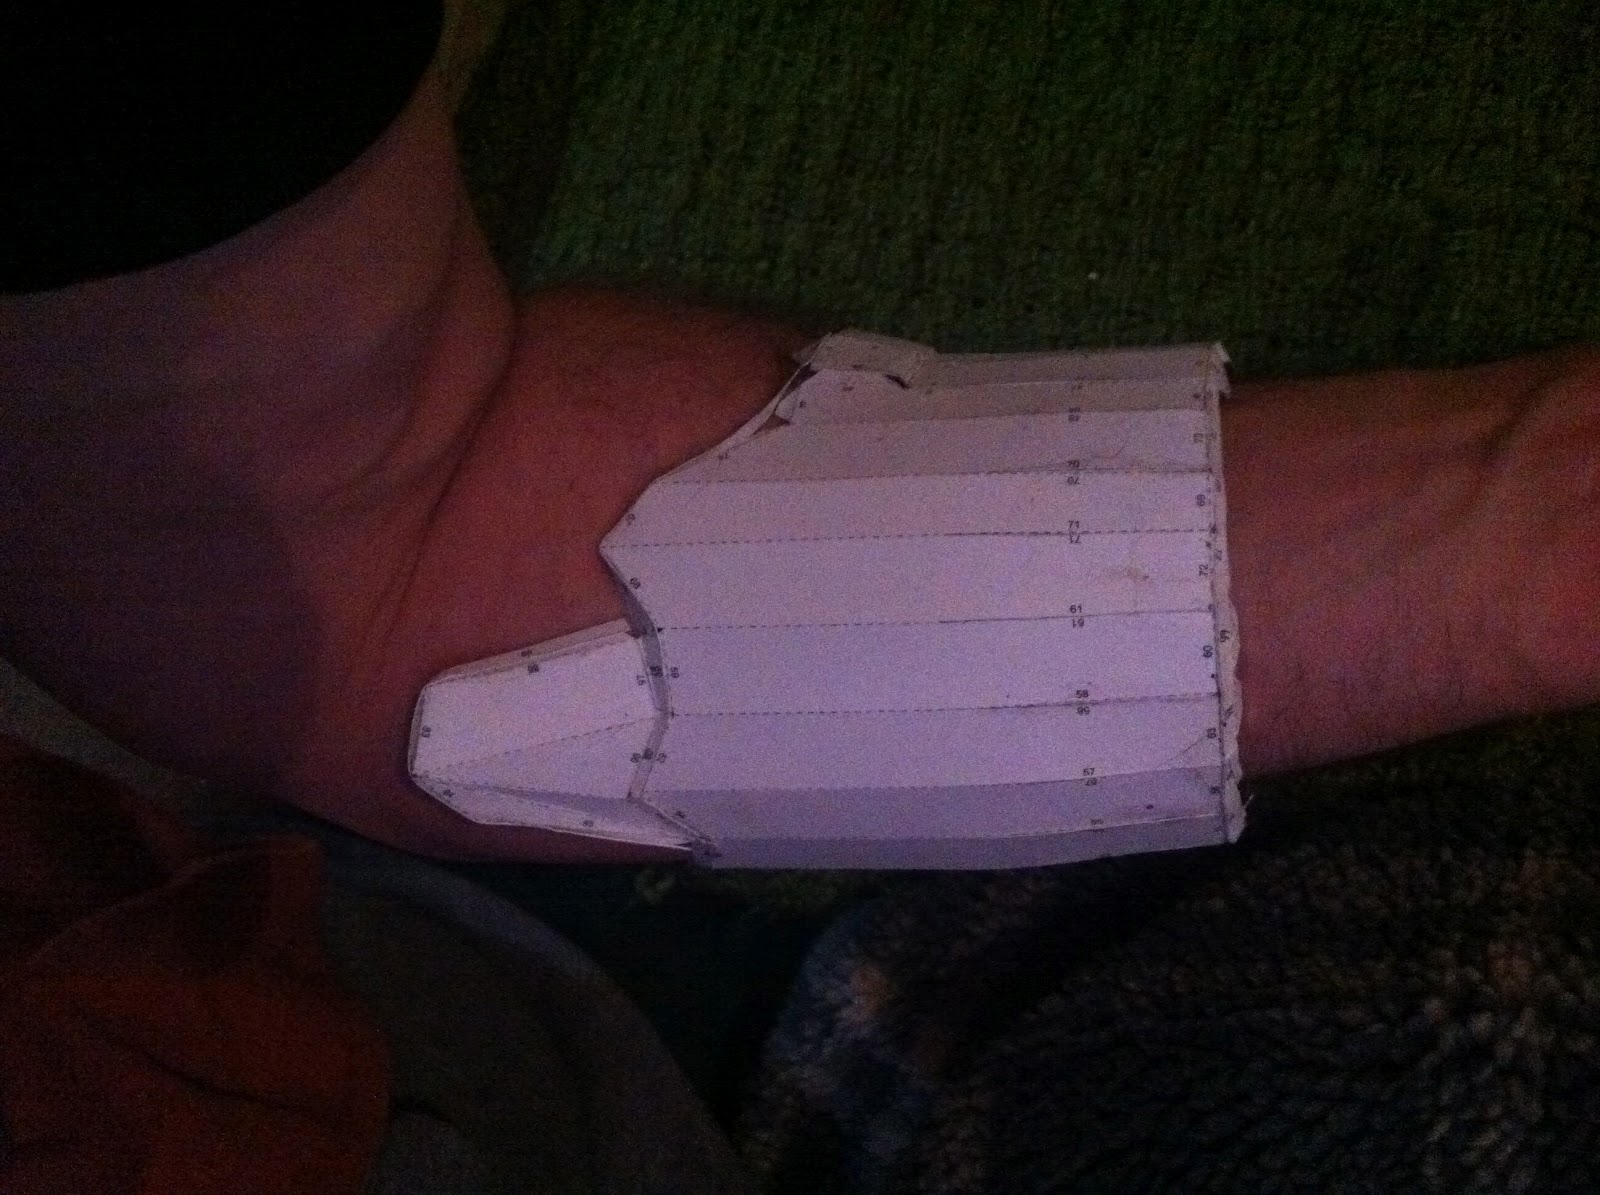
I extended the 'length' of each piece, but kept the sides the same measurement by simply retaining the angled edges at the bottom of each piece and simply drawing a straight line from top point to top point.

The line was (and the wedge was cut out from)
where the white paper shows through at the top of the piece.
I then sliced a small wedge out of the top line by measuring a half-inch down from the middle point and drawing the lines back to each top point. You can see where the 'new' pieces wre cut straight across (picture to the left) and where the wedge was cut out of the top.
WHY did I include the wedge-cut?
You'll figure this out pretty quickly if you rivet the pieces
together and don't remove the wedge - if you don't cut the wedge, the pieces won't be able to articulate smoothly, as the bend of the pieces causes the piece underneath to cram into the on on top of it.
Trust me... a half-inch wedge is all you need and it works well.


Next comes attaching the pieces...


Each piece will articulate with the ones above and below it, that part's pretty obvious... but there's  special way to do it... and once again, have a look at a wood bug / pill bug or armadillo. When they curl up their concave (belly) side must contract, with the plates sliding into each other (technically that isn't completely accurate, as they curl up to protect their softer underbellies, but I digress)...
So with the concave parts of the joint - to mimic this - the plates will be in a row, and the one above will be tucked behind the one below it in the chain.
Like so:


The trick here is that the plates slide over each other a little when the joint bends... moreso than they did when they were straight (as seen above).

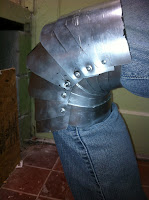
As for the 'convex' side of the joint (the 'outer armor' of the armadillo, if you will) the exact opposite happens. The plate above sits on top of the one just underneath it... and each one in turn pulls a little away from the one above it.


As for how each piece fits to the other, you can rivet them together one side at a time, or one 'level' at a time... the difference is not really noteworthy, but be sure you make the pieces a) large enough that you can fit your body in them and b) small enough that they fit inside the armor.


I found this more problematic for the arms... there's a lot less room inside the bicep piece and I already had to scale it up to fit my arm... once I get to the armor arm pieces, I may change my
tune, but so far, I've kept them within both measurements (my arm and the armor)... they're tight on my arm, but I don't really plan to require them to be anything moe than cosmetic anyway.
... and as you can see, they have SOME range, but not nearly a full range of motion... about a 90 degrees or so of bend at the elbows, with a little more for the knees as they're larger pieces... so long as I can hold a tumbler full of amber-coloured alcohol to my lips, I'll be fine.  =)

My plan is to adhere them to adjustable straps which will buckle to a harness. Trust me... it'll work. The thought is to attach the joint units to the clothes underneath, that way there a lot less chance of anything slipping.

Stay tuned!